The Teddy Bear Blanket: Both a Crochet and Knit pattern!

so my brother in law is having a baby boy in August – and I wanted to make him and his new family a blanket. I started with a crochet pattern, because, quite frankly, I am INFINITELY better and faster at crocheting than I am at knitting.

So I found this pattern – and I made the following square

The problem is, that at certain angles you can tell there is a teddy bear, but for the most part, he is hardly visible. I was rather disappointed actually. So despite the fact that this measures about 12″ x 12″ and took me only an hour to whip out – I decided to find a new pattern.

That is when I came across this one. This teddy bear baby blanket is actually knitted. Which is a much slower process for me. And each square is about 7 1/2″ x 7″ – and each ones takes me more like 2 hours. which, to be honest – is a very slow process. However, it is absolutely adorable.

For some reason, the colors are really weird. The top bear is the same color as the blue in the above crochet’d square. and the bottom bear is actually a bright teal color.

I am really happy with where it is going. I am doing it slightly different than the pattern, because the pattern called for circular needles, and my circular needles are pre-occupied. So instead I am knitting it in verticle strips. I think 4 by 4 bears. and then I will sew them together and crochet a border.


Did you have a blanket or stuffed animal that was a favorite as a child? Do you still have it?

Mine was a cloth doll named Lyndsay – I still own her – in fact as a kid I took her everywhere and the legs came unsewn. I hadn’t really thought of her in years…  but about a year ago my mom actually got her fixed and gave her back to me. cool… yes?


Blue Lagoon Spa Clothes – Crochet For Donation

10 wash clothes into my wash clothes – and here I have two Blue Lagoon Spa Clothes 

Considering how incredibly quick and easy and nice looking these are, there may be another one or two of them before everything is said and done.


The pattern: uses only hdc and chains

The yarn: 

Blue ~ Village Yarn Caribbean Cotton (no color info on packaging)

Purple ~ Reynolds Saucy (no color info on packaging)

Yellow ~ Lily Sugar’n Cream (Color: Cream)

Hook size: G


If you want to make these yourself, the purple yarn was really nice to work with. I think the blue yarn is a little flimsy and it didn’t crochet up quite as well – as you can see in this picture.

That being said, this pattern, by Heather P, was very easy to follow and use. I believe that the very first step (chain 32 then hdc in 3rd chain from hook) might be off. In order to wind up with 31 stitches after hdc in 3rd chain from hook, you would have to chain 33. I extended mine longer; the purple one is 33 across and the blue one is 35 across (they come out to the same size – due to the blue being finer than the purple)

Otherwise – this pattern has great detail. I would highly recommend this pattern and perhaps anything by Heather P and look forward to perusing her blog for more patterns.


Ending today with a completely unrelated question – Do you crave sweet or salty things?


More Wash Clothes Knitted for Donation

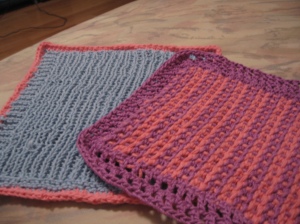
So here we go again – I am now up to 7 completed wash clothes. I have the four from this post as well as the two here. Additionally I have 1 of these done and 1 in progress, but as I am using the same pattern for both, I will wait till they are both finished to showcase them. So here are the two newest knitted wash clothes.

To be honest, I am not really in love with either one. The purple and pink one looked FANTASTIC before I added the border. But the problem is that I am knew to knitting and really incapable of predicting how wide it will be till I get an inch or two into the pattern. Thus the pink and purple one turned out WAY too small. Rather than start over, I though I would just keep going and add a border at the end. Only, I think the border kinda ruined it. The pink and purple pattern is also from my Essential Guide to Color Knitting Techniques book . The name of this stitch is called “Dotted Ladders” and like many of the other wash clothes I have made from this book, uses a series of *Slip 1 with yarn in back* and *slip 1 with yarn in front*.

Here is the pattern up close

See how nice the inner part looks? I actually may do another one of these if (when) I get more yarn.

The border is just a simple double crochet stitch, two rows of it with three dc in each corner. On the long sides I alternated between dc and chain 1, effectively skipping every other stitch. This was easier because of the way the edging came together, but in retrospect, I think that is what makes it look so odd, with solid dc on top and bottom and alternating with holes on the sides.

The other wash cloth (the blue one) was intended to have a heart shape inside of it. I was designing it off of the leaf wash cloth I made, but it wasn’t working out quite right and … well… then… I discovered Glee. And I simply couldnt watch it and knit at the same time if I was so focused on doing and undoing a made up pattern, that I decided to just go with alternating knit and purl on each row to make the ribs. on the edges of the blue though, I just knitted both sides, to try and make a border. and then decided to single crochet a pink border around it to bring it together. It’s okay, but I like all the ones from my first post better.


Help me with new directions. What is your favorite color combination? (two or three colors?)


Sewing Update – Skirt Pattern, Pictures, and More!

As mentioned in a post last week, I am taking a sewing class. Each week we get one step closer to making a skirt. We were able to choose a pattern from a selection of about 15 patterns and I selected to make the Butterick B4686 pattern.

I am making the “brown” skirt, though obviously if you are following along with my sewing adventure posts, you would have seen that my fabric is pink (image of fabric).You can see the plain look below – I am doing item “C”.

In last week’s class (March 31st) we cut out our fabric and learned how to do an overcast stitch around all the edges so we do not have to worry about the edges of the fabric fraying. Because each of us either has a waist line or a yolk (in my case it is a yolk – the top piece of the pattern where a waist band would normally be found). Here are some pictures of my fabric freshly cut, with the pattern still pinned in place!

And this is the skirt cut out 🙂 there is another piece but here you can see 3 of the 4 pattern pieces (there are multiples of each one)


Of the six skirt designs, which one is your favorite?